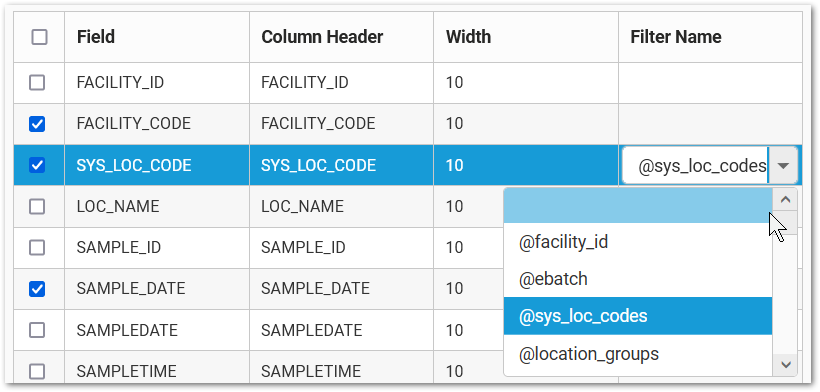
The Data Grid widget can be configured to act as a dashboard filter, using the underlying report's parameters as the filters and the data as the filter values. Use the Widget Editor to configure a Data Grid widget to act as a dashboard filter. Any visible field(s) can be set as the dashboard filter by navigating to the field row, then selecting the appropriate value from the drop-down in the Filter Name cell.
The columns (fields) that are configured to be used as filters will display the ![]() icon next to the column name in the grid header. When filtering is enabled, the report name will no longer display on the widget.
icon next to the column name in the grid header. When filtering is enabled, the report name will no longer display on the widget.

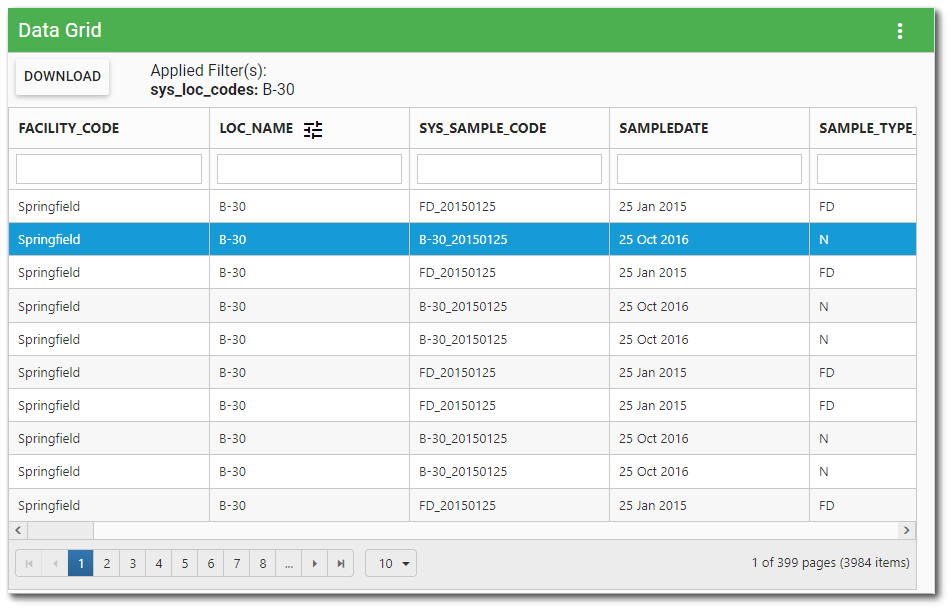
When the Data Grid widget is configured to be used as a dashboard filter, selecting a data row in the grid will result in the filter column(s) being used as filter value(s) for the selected filter, and other widgets on the dashboard will filter their data in response to the filter value(s). The selected filter(s) and value(s) are displayed above the data grid. In the image above, B-30 is the filter value for LOC_NAME (i.e., SYS_LOC_CODE) and all other widgets on the dashboard affected by the filtering will only display content associated with Location B-30.
Note: Refreshing the Data Grid widget will clear selected filtering values. The active filter (i.e., selected row) will also be removed if the user sorts or filters the data columns of the Data Grid widget or changes the pagination. |
Once the Data Grid widget is configured to work as a dashboard filter, it will no longer respond to other filters on the dashboard. The Data Grid widget will also override any other filters (e.g., Filter-List widgets) set to the same parameter on the dashboard (i.e., the filtering functionality is not additive). For example, if the FACILITY_ID and SYS_LOC_CODE columns are configured to be used as a filter, the session facility and any SYS_LOC_CODE filter on the dashboard will be overridden when a data row is selected.
Multiple Selections Option
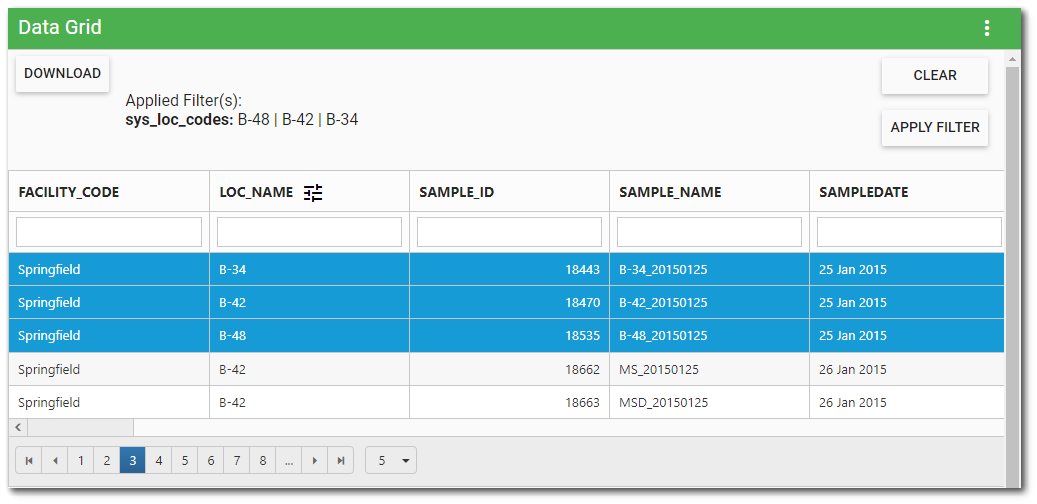
The Data Grid widget can be configured (in the Widget Editor) to allow selecting multiple rows, which will filter on multiple values simultaneously. Users can select multiple filter rows by holding down CTRL+ or SHIFT on the keyboard and clicking a new row. Once row(s) are selected, the "Apply Filter" button will be enabled. Click the Apply Filter button to have other widgets on the dashboard filter their data in response to the filter value(s). The selected filter(s) and value(s) are displayed above the data grid. Click the Clear button to clear the filters.

In the image above, the filter values for LOC_NAME (i.e., SYS_LOC_CODE) are B-34, B-42, and B-48. All other widgets on the dashboard affected by the filtering will only display content associated with these three locations.
Note: If Multiple Selections is enabled and OData requests are configured, only the first row selected will be editable. |
Backwards Compatibility
Filters that were previously applied, then removed, in builds prior to EQuIS 7.22.1 may still have a Filter Name populated. In EQuIS 7.22.1 and up, this will enable the filter for that field. Remove the filter by setting the Filter Name field to the first (blank) entry in the dropdown.

Alternately, removing the variable in the Advanced Tab of the Data Grid widget also clears the Filter Name. In the example below, the double quotation marks ("") remain, but the text @sys_loc_codes is removed.
"SYS_LOC_CODE": {
"title": "SYS_LOC_CODE",
"list": true,
"width": 10,
"headerText": "SYS_LOC_CODE",
"filterName": "@sys_loc_codes"
},