•Setting Up Esri Authentication
User Roles
The ArcEQuIS connection requires an EQuIS 7 Enterprise site (Build 19300 or later) with REST API licensing. EQuIS users must be assigned to the REST API role (in Enterprise) to connect to a database. Assigning users to the REST API role must be done by an EQuIS Enterprise Administrator (a user assigned to the Admin role). The Admin user will need to login to EQuIS Enterprise, navigate to the Administration Dashboard, and then use the Roles tab of the User Profile Editor to assign the REST API role to each user they want to be able to use the ArcEQuIS Interface.
In order to run reports and create spider diagrams from ArcEQuIS, users must also be a member of an Application Level Security (ALS) role, with adequate permissions to access facilities, run reports and create user reports (i.e. a Read/Write ALS role).
Setup and Configuration
1.Download the ArcEQuIS Add-In file (ArcEQuIS.esriAddinX) from the EarthSoft Community Center under All Items > Products > ArcEQuIS, and unblock it. It is typically only available for the designated EarthSoft Primary Point of Contact (POC) for organizations with the appropriate licensing. If your organization has the appropriate licensing and the POC does not see the file on the ECC, please email EarthSoft Support requesting access.
2.Save the ArcEQuIS.esriAddinX file to your {Documents}\ArcGIS\AddIns\ArcGISPro folder. (If this folder does not exist, create it manually).
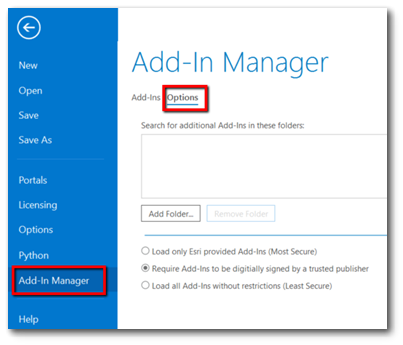
3.Start ArcGIS Pro Desktop. On the Options tab in the the Add-In Manager, set the security to "Require Add-Ins to be digitally signed by a trusted publisher".

Upgrading
To update to a newer version of the ArcEQuIS Add-in:
1.Download the ArcEQuIS Add-In file from the EarthSoft Community Center.
2.Unblock the download.
3.Replace the ArcEQuIS.esriAddinX file in your {Documents}\ArcGIS\AddIns\ArcGISPro folder with the newer version of the ArcEQuIS Add-In file.
Setting Up Esri Authentication
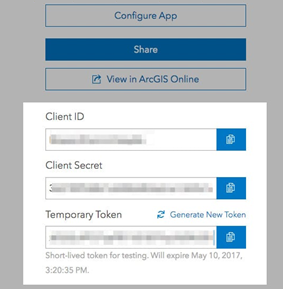
1.Register an application with ArcGIS Online by following Esri’s instructions, posted here:
https://developers.arcgis.com/documentation/core-concepts/security-and-authentication/accessing-arcgis-online-services/
2.To link your Enterprise site to your Esri account to allow for SSO, create a new record in the ST_CONFIG table with the values provided in the Esri portal as shown below.

CONFIG_SECTION = 'ArcEQuIS'
CONFIG_KEY = 'https://www.arcgis.com/'
(the Esri portal URI)
OBJECT_TYPE = 'clientId'
OBJECT_VALUE = '{client_id}'
(The Client ID assigned by the Esri portal)
STRING_VALUE = '{client_secret}'
(The Client Secret assigned by the Esri portal)
CONFIG_SECTION |
CONFIG_KEY |
OBJECT_TYPE |
OBJECT_VALUE |
STRING_VALUE |
|---|---|---|---|---|
ArcEQuIS |
https://www.arcgis.com |
clientld |
{client_id} |
{client_secret} |
Enable Logging
ArcEQuIS event logging uses the ArcGIS Pro diagnostic functionality (see ArcGIS Pro Concepts) that is disabled by default.
Administrators may enable ArcEQuIS logging by running ArcGIS Pro from the command line with the enable argument:
“C:\Program Files\ArcGIS\Pro\bin\ArcGISPro.exe" /enablediagnostics.
The ArcEQuIS event logging will populate a new ArcGISProLog.xml file located in the default Documents path (typically {Documents}\ArcGIS\Diagnostics).