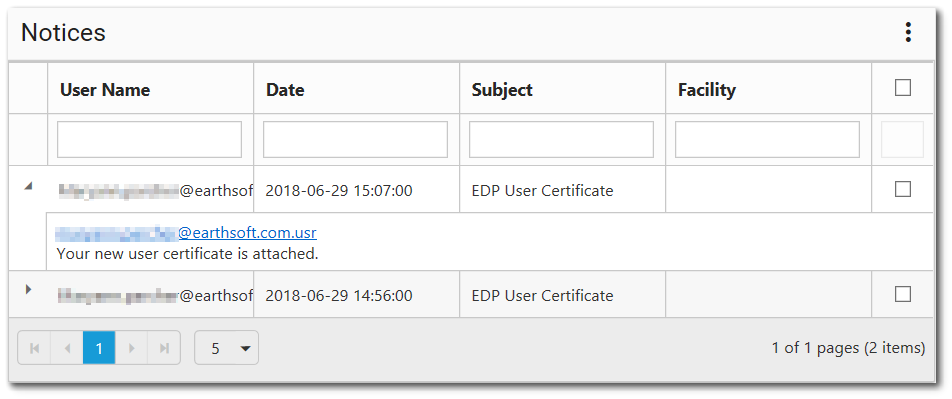
Users can view application notices (e.g., EDD status notices, EIA notices, etc.) with the Notices widget. The widget displays a list of notices pertaining to a user and can either be viewed on the standard Notices dashboard or be added to a user dashboard. Display is limited to 1000 notices.

The notices contain the user name, notice date, notice subject, and if applicable, the facility related to the notice. The list of notices can be sorted or filtered based on these properties.
Sorting – The columns are sortable by clicking on the column header (click again to reverse the sort). Sorting is alphabetically (A to Z or Z to A) or by date order (recent to last or last to recent). Note that sorting does not change the current page, and the first or last values of the sorted column may not be displayed, unless on the first or last page of the list.
Filtering – To filter the notices, enter a search term (one or more characters) in the appropriate search box beneath the column header. The display of notices will be limited to the search string. Notices will be limited to the selected facility or facility group of the dashboard. To see notices from a different facility, select the facility in the Facility Chooser at the top of the dashboard. To see notices from all facilities, leave the session facility blank.
Refresh – To ensure that the notices displayed in the widget are the most recent, the widget can be refreshed. This may be desired to check for new notices. To refresh the Notices widget, select the More Options ![]() icon in the upper right corner of the widget to open the drop-down menu and then select the Refresh menu option.
icon in the upper right corner of the widget to open the drop-down menu and then select the Refresh menu option.
Notice Information – By clicking the triangle next to the user name, the notice can be expanded to display the notice message body and any attachments. If a file is associated with the notice, it can be downloaded by clicking the hyperlinked file name. Click the triangle again to hide the notice detail information.
The bottom of the widget contains paging controls for displaying a limited number of notices at a time, as described below.
Arrows – Use the left/right arrows to navigate through pages.
Go to Page List – Select a specific page to navigate directly to that page.
Rows per Page – Change the number of notices to be displayed per page by using the drop-down menu.
Count of Pages and Total Items – This control indicates the total number of notices available in the widget, how many pages to display the notices, and which page is currently selected.
Widget Properties
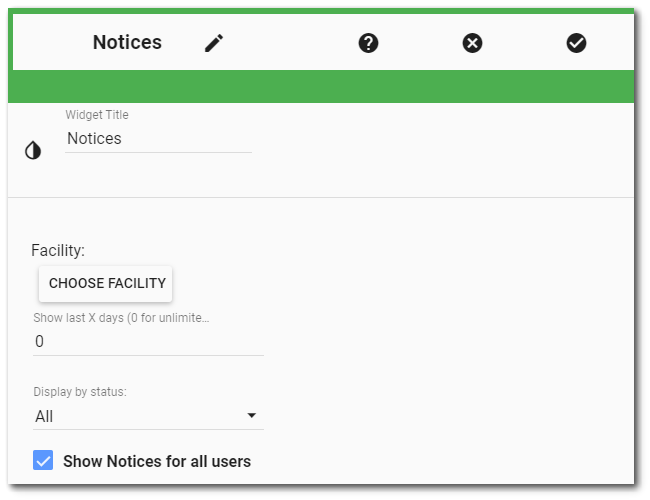
To change properties of the Notices widget, open the Widget Editor by selecting the More Options ![]() icon in the upper right corner of the widget to open the drop-down menu and then select the Edit menu option.
icon in the upper right corner of the widget to open the drop-down menu and then select the Edit menu option.

Widget Title – By default, the widget title is Notices. The title can be modified.
Widget Color – The color of the widget can be changed using the Widget Theme![]() icon to the left of the widget title.
icon to the left of the widget title.
Facility – Use the Facility Chooser to limit the results to notices associated with a single facility, regardless of the session facility. If a facility is not set in the Widget Editor but a session facility is set, the notices are filtered on the session facility. In neither a facility or a session facility is designated, all notices are displayed.
Show last X days – This value limits the notice list to notices that have been created in the past number of days selected. Enter zero (0) to not place a time limit. Please note that increasing the value or leaving as unlimited will slow down the performance of retrieving the notices from the server.
Display by status – There are three values to choose from: New, Read and All. Selecting New limits the notice list to only unread notices. Selecting Read limits the notice list to unread and read notices. Selecting All shows all notices, including deleted notices.
Show Notices for all users – This option only appears if the user is an administrator. If this option is selected, the notice list will show notices for all users. A new column showing the user, if applicable, is included in the notice list.
Widget Object Editor – To set various appearance properties of the widget, select the Object Editor ![]() icon in the widget header to open the Widget Object Editor. See the Widget Editor article for more details.
icon in the widget header to open the Widget Object Editor. See the Widget Editor article for more details.
Help – The Help ![]() icon connects to the online documentation related to the specific widget.
icon connects to the online documentation related to the specific widget.
Copy Settings – Select the Copy Settings ![]() icon to to copy the settings from another widget of the same type. See the Copy Widget Settings article for more information.
icon to to copy the settings from another widget of the same type. See the Copy Widget Settings article for more information.
Cancel – Select the Close without Saving ![]() icon to exit the Widget Editor without saving changes.
icon to exit the Widget Editor without saving changes.
Save – Changes will be applied to the widget by clicking on the Save ![]() icon. The Widget Editor screen will close after the save operation is complete.
icon. The Widget Editor screen will close after the save operation is complete.